This article is currently in the process of being translated into Thai (~58% done).
Installing Apache webserver
Apache คือ webserver (ที่ทำให้เครื่องคอมพิวเตอร์สามารถจัดการกับ webpage ได้) ในบางครั้งคุณอาจจะไม่ต้องการที่จะใช้ public webserver ในเครื่องคอมพิวเตอร์ของคุณ Apache เป็นตัวช่วยที่ดีในการทดสอบระบบ ง่ายต่อการติดตั้ง และทำงานร่วมกับ PHP ได้อย่างดีเยี่ยม Apache เป็น Free Software ที่มี Source Code ให้เราเลือกใช้อย่างมากมาย และที่สำคัญเราไม่จำเป็นต้องเสียค่าใช้จ่ายใดๆเพิ่มเติม
คุณสามารถ Download Apache ได้จาก http://httpd.apache.org/download.cgi เราไม่สามารถให้ Direct link download ไปที่ไฟล์ติดตั้งได้เนื่องจาก Apache จะมีการปรับปรุงเวอร์ชั่นบ่อยครั้ง เข้าไปที่ Download Page และเลือก Download Link ที่เหมาะสม (โดยค้นหาข้อความลักษณะนี้ "Apache HTTP Server X.X.X is the best available version." ในขณะที่บทความนี้ถูกเขียนขึ้น Apache รุ่นล่าสุดคือ 2.2.4 ถ้าคุณใช้งาน Windows (ซึ่งเราจะสมมตว่าคุณใช้ Windows ในบทเรียนต่อๆไป) ให้คุณทำการคลิก download link ที่เขียนว่า "Win32 Binary (MSI Installer)" ไฟล์ Installer จะทำให้เราสามารถติดตั้งโปรแกรมได้อย่างง่ายดาย
เมื่อทำการ download เสร็จแล้ว ให้ run installer และกด ยอมรับ (accept) ข้อกำหนด ฯลฯ จนกระทั่งคุณมาถึงหน้าจอลักษณะนี้
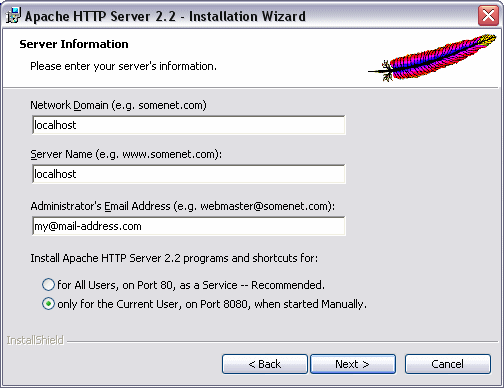
You may enter localhost in the first two fields, like I've done. They are not that important for our purposes, and neither are the e-mail field. The radiobuttons are a bit more important - you should decide whether or not the webserver should be installed as a service, which will be started automatically by Windows, or as a standard application, which you may start manually. The automatic version will operate on port 80, which is the default port for HTTP communication, while the manual version operates on another port, 8080 in this case. As you can see, I have selected the second option. My computer already runs another webserver on port 80, and besides, I only need this for testing, so starting the server manually when I need it works best for me.
ในหน้าจอถัดไป ให้เลือก Typical และดำเนินการต่อ คุณจะพบกับหน้าจอที่ให้เลือกตำแหน่งในการติดตั้ง Server ในเครื่องของคุณ เราสามารถเลือกใช้ตำแหน่งเริ่มต้นได้ จากนั้นให้ดำเนินการตามขั้นตอนอัตโนมัติ (Wizard) และติดตั้งไฟล์ที่จำเป็น เมื่อแล้วเสร็จ เราสามารถเริ่มใช้งาน Server ได้ทันที โดยการเลือก Start -> Apache HTTP Server -> Control Apache server -> Start Apache ในกรณีที่มีการใช้งาน Firewall คุณอาจจะได้รับคำเตือนให้ทำการ unblock Apache ถ้าคุณต้องการที่จะใช้งาน Server จากสถานที่อื่นๆ (non-local computer) ให้ตอบ ตกลง
ตอนนี้คุณจะสามารถเริ่มใช้งาน Server ได้ทันที เพื่อทดสอบระบบ ให้เปิด Browser และพิมพ์ http://localhost/ ถ้าคุณติดตั้งที่ port 80 หรือ พิมพ์ http://localhost:8080/ ถ้าคุณติดตั้งในเวอร์ชั่น manual คุณควรจะเห็นข้อความบนหน้า webpage ว่าระบบ server ทำงานปรกติ ถ้าใช่ ยินดีด้วย ตอนนี้คุณมี webserver แล้ว
ใน folder ที่คุณติดตั้ง Apache (โดยปรกติแล้วจะเป็น C:\Program Files\Apache Software Foundation\Apache2.2\) เราจะเจอ folder ที่ชื่อ "htdocs" เป็น folder ที่สำคัญมาก โดยจะเป็นข้อมูลที่ทำหน้าที่เป็น root ของ webserver คุณสามารถทดสอบสร้างไฟล์ใหม่ จากนั้นทดสอบการเข้าถึงผ่านทาง http://localhost:8080/filename เช่น http://localhost:8080/test.html ในทำนองเดียวกันเราสามารถสร้าง subfolder (แฟ้มข้อมูลย่อย) ได้เช่นกัน ตอนที่เราทำการทดสอบระบบในบทเรียนต่างๆ เราจะทำการบันทึกข้อมูลไว้ที่ folder htdocs เพื่อที่จะสามารถเข้าถึงได้ผ่ผานทาง webserver ขอให้ห้ามลืมวิธีการนี้เด็ดขาด