This article is currently in the process of being translated into Spanish (~56% done).
Installing Apache webserver
Apache es el servidor web, el cual se asegura de que tu equipo sea capaz de servir páginas web. Puede que no quieras arrancar un servidor web público en tu máquina, pero Apache también es bueno para realizar pruebas, es muy sencillo de configurar y funciona genial con PHP. Apache es software libre, que en pocas palabras significa que el código fuente está disponible y no tienes que pagar por él.
Apache se puede descargar desde http://httpd.apache.org/download.cgi. No tendría sentido dar un enlace directo a la descarga, puesto que Apache se actualiza a menudo. Ve a la página de descargas y selecciona el enlace de descarga adecuado bajo el encabezado que diga algo como "Apache HTTP Server X.X.X es la mejor versión disponible". En el momento de escribir esto, la versión actual es 2.2.4. Si eres usuario de Windows, lo que se asume en este tutorial, entonces haz clic en el enlace que dice "Win32 Binary (MSI Installer)". Usar un instalador hace que el proceso sea más sencillo.
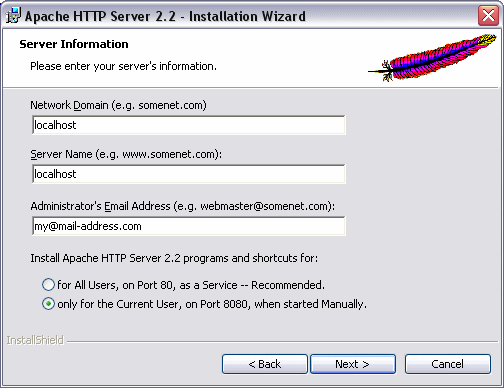
Tras la descarga, inicia el instalador y acepta los términos de licencia, etc... Todo debería ser muy estándar, hasta que llegues a la pantalla siguiente:

Puedes introducir 'localhost' en los dos primeros campos, como yo he hecho. No son tan importantes para nuestro propósito, ni tampoco la dirección de correo electrónico. Los botones de selección son más importantes: debes decidir si el servidor web se instalará como servicio, que Windows arrancará automáticamente, o como aplicación estándar, que tú podrás iniciar manualmente. La versión automática funcionará en el puerto 80, que es el puerto por defecto para la comunicación por HTTP, mientras que la versión manual lo hará en otro puerto, 8080 en este caso. Como puedes ver, he seleccionado la segunda opción. Mi ordenador ya ejecuta otro servidor en el puerto 80 y, además, sólo necesito este para pruebas, así que iniciarlo manualmente cuando lo necesito funciona mejor para mí.
On the next screen, simply select Typical, and move on. You will get to the screen where you select a path to install the server to. The default path will work fine. Now go on through the wizard, and let it install the required files. When you're done, you may start the server by selecting Start -> Apache HTTP Server -> Control Apache server -> Start Apache in Console. If you have a firewall, it might ask you whether or not it should unblock Apache. If you wish to be able to access your server from a non-local computer, you should say yes to that.
Now your new server should be running. To test it, point your browser to http://localhost/ if you installed it on port 80, or http://localhost:8080/ if you installed the manual version. You should see a text telling you that everything works fine. Congratulations, you now have a webserver.
In the folder where you installed Apache, usually something like C:\Program Files\Apache Software Foundation\Apache2.2\, you will find a folder called "htdocs". This is very important, since it serves as the root of your webserver. You may try creating a new file, and then access it through http://localhost:8080/filename, e.g. http://localhost:8080/test.html. You may create subfolders as well. When we test stuff through the chapters of this tutorial, we save it to the htdocs folder, to be able to access it through our webserver, so don't forget about it anytime soon.